Introduction
Reference(Plagiarism🤣):
https://www.right.com.cn/forum/thread-4053183-1-1.html https://blog.csdn.net/kangzeru/article/details/115373587
😄This artical is just a reminder for myself, not a tutorial. Hopefully it helps you too.
My configuration is as below:
| Accessory | Type |
|---|---|
| CPU | Intel i7-6700 |
| MOTHERBOARD | ASUS Z170 Pro Gaming |
| NET ADAPTER | RTL 8125B(with 2 2.5G RJ45) |
| DISKS | Q200EX 480G,PM961A 256G,ZFS:1TB |
| SYSTEM | PVE 7.2-4 |
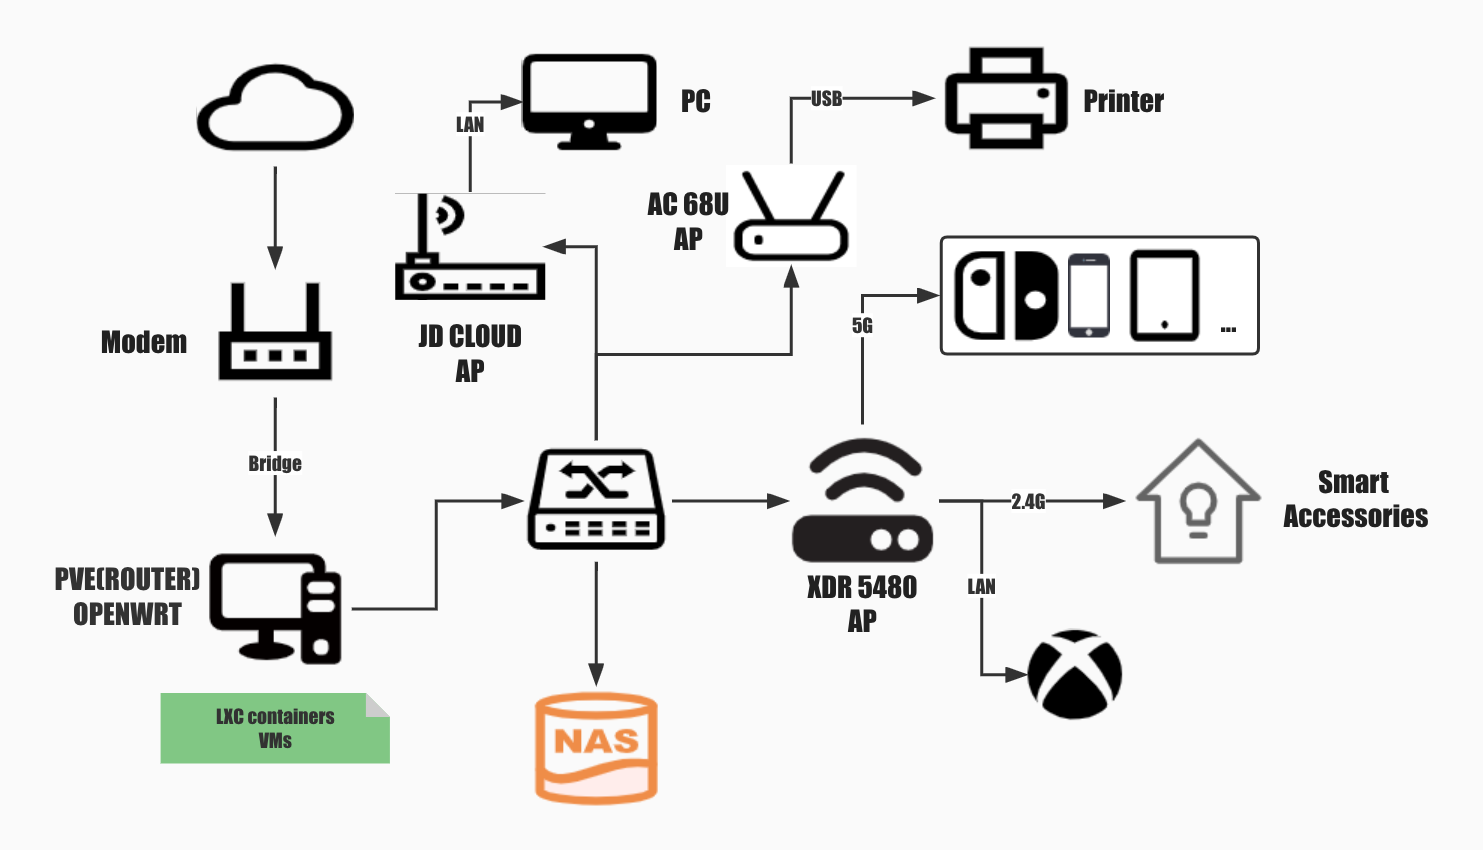
The network topology is as below:
I've found a repository pve-edge-kernel, it seems to cover configuration and template of LXC openwrt. Anyone interested can hava a try on your own.
Steps
Create the LXC template
Here I used is the slim release of nanopi-openwrt made by klever1988 for that it is simple enough but with the basic extensions installed(e.g. FULLCONE, Argon Theme).
If your PVE lacks FULLCONE, you may need to build it from the source. Here attached the tutorial
Download the firmware you like
cd /var/lib/vz/template/cache/
wget https://github.com/klever1988/nanopi-openwrt/releases/download/2022-07-08/x86-slim.img.gz
If the image you've downloaded is rootfs.tar.gz, you can jump to Create the LXC container.
Mount all the partitions in this raw disk image
kpartx -av x86-slim.img
Under the /dev/mapper, there are 2 loopXpY, one of this contains the Openwrt System.(e.g. loop0p1)
Mount it to path /mnt
mount /dev/mapper/loop0p1 /mnt
Package it to rootfs.tar.gz
tar zcvf openwrt-x86-64-generic-rootfs.tar.gz /mnt/
Unmount
umount /mnt
kpartx -d x86-slim.img
Create the LXC container
PVE CLI Commands
pct create <vmid> <ostemplate> [OPTIONS]
| Name | type | Description |
|---|---|---|
| vmid | integer(1-N) | The (unique) ID of the VM |
| ostemplate | string | The OS template or backup file (local:vztmpl/openwrt-x86-64-generic-rootfs.tar.gz) |
Options
| Name | type | Description |
|---|---|---|
| --rootfs | storage:disksize | Use volume as container root. |
| --ostype | alpine or debian etc. | OS type. |
| --hostname | string | Set a host name for the container. |
| --arch | amd64,arm64,armhf,i386 | OS architecture type. |
| --cores | integer(1-8192) | The number of cores assigned |
| --memory | integer(16-N) | Amount of RAM for the VM in MB. |
| --swap | integer(0-N) | Amount of SWAP for the VM in MB. |
The more detailed infomation about PVE is available at PCT-DOCs.
Initialize a LXC container
With the upper commands, we can initialize a container
pct create 100
    local:vztmpl/openwrt-x86-64-generic-rootfs.tar.gz
    --rootfs local-lvm:8
    --ostype unmanaged
    --hostname openwrt
    --arch amd64
    --cores 4
    --memory 1024
    --swap 0
    -net0 bridge=vmbr1,name=eth1
Modify the configuration of container
Add the content of below:
# there are some basic configurations in openwrt.common.conf
# which is already existed in PVE system
lxc.include: /usr/share/lxc/config/openwrt.common.conf
# allow /dev/ppp for openwrt dial up with PPPOE protocal
lxc.cgroup.devices.allow: c 108:0 rwm
# assign a specific hookscript
hookscript: local:snippets/hookscript.pl
# Passthrough the physical network card for container
lxc.net.1.type: phys
lxc.net.1.link: enp6s0
lxc.net.1.flags: up
The container will always load the /usr/share/lxc/config/openwrt.common.conf whatever you add it to the configuration of lxc container or not
If you will use openclash in your container or happen to see the error with this format "Unable to set capabilities [sth.] ...", you need to modify the openwrt.common.conf
Comment this 2 lines in below file.([sth.] you lack, and the line where it locates should be commented)
# lxc.cap.drop is meant to discard some capabilities
lxc.cap.drop = sys_ptrace
lxc.cap.drop = sys_resource
Create the hookscript
Here we used the official example guest-example-hookscript.pl to modify
Create the folder
mkdir /var/lib/vz/snippets
Copy the guest-example-hookscript.pl to the folder
cp /usr/share/pve-docs/examples/guest-example-hookscript.pl /var/lib/vz/snippets/hookscript.pl
Edit this file, you will see the content below at line 36:
    # Second phase 'post-start' will be executed after the guest
    # successfully started.

    print "$vmid started successfully.\n";
Add the content below to enable TUN and PPPOE:
    # Second phase 'post-start' will be executed after the guest
    # successfully started.
    system("lxc-device add -n $vmid /dev/ppp");
    system("lxc-device add -n $vmid /dev/net/tun");
    print "$vmid started successfully.\n";
Start the LXC container
Start the specific container with VMID and then start the LXC terminal
pct start 100
lxc-attach 100
Configure your network
config device
        option name 'br-lan'
        option type 'bridge'
        list ports 'eth1'

config interface 'lan'
        option device 'br-lan'
        option proto 'static'
        option ipaddr '192.168.1.5'
        option netmask '255.255.255.0'

config interface 'wan'
        option device 'enp6s0'
        option proto 'pppoe'
        option username 'xxxxxx'
        option password 'xxxxxx'
Restart the network and firewall
/etc/init.d/network restart
/etc/init.d/firewall restart
Start surfing on the Internet
🎉Congratulations!
Now, you may already have Internet access. You can add further configuration such as installing plugins, adjusting your settings with web interface at http://192.168.1.5